Crosman Nirto Lubricating Airsoft Oil Review

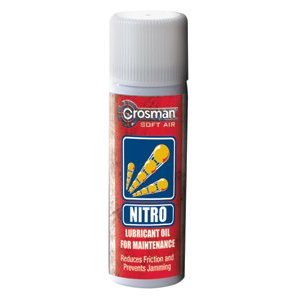
Crosman Nitro Lubricating Oil spays directly down the barrel of a airsoft gun and acts like WD40: helping decrease friction on the BB and increase velocity.

The saying “A little bit goes a long way,” is definitely applies when using Crosman Nitro Lubricant. If you spray too much then it can clog your gun and dramatically decrease BB velocity. And it’s also near impossible to remove once it’s inside the barrel, so just try to use a little bit at a time.

I personally accidentally sprayed too much into my Stinger P9, which before could hit targets from over 40 feet away with extreme accuracy, but will now only fire BBs 15 feet before they drop to the ground. I’ve tried multiple times to clean the barrel out with a cleaning rod to no effect. Like I said before, just use a little bit at a time (any more than a 2 second burst is too much).

Crosman says that for the first 100 shots after you’ve applied the Nitro Lube your gun will have decreased power and accuracy, but, in my experience, it usually takes a good 200 to 300 shots to fully regain the original power and accuracy. It’s not a huge deal, but immediately after you’ve used the Nitro Lube and cleaned out the extra residue, you should go out and stand about five feet away from your target and just unload the 200-300 shots to get your gun back to normal. This way, if the next day you want to go shoot, you can just start shooting like normal instead of having to shoot 300 breaking-in rounds.

Even after the first 200-300 shots, when you’ve regained the accuracy and power, there’s not much of a difference in velocity. In fact, if you test fired your gun before using the Nitro Lube, then test fired after you used the Nirto Lube (and fired the first 200-300 breaking-in shots), you really wouldn’t even be able to tell a difference. However, it does decrease jamming and help protect the barrel and prolong the guns overall life expectancy.

In a wrap, Crosman Nirto Lubricant won’t do much to increase velocity, but it can help protect your gun and prevent jamming. If you have a gun that’s already running well, then you might not want to risk accidentally spraying in too much lube and clogging your gun. But, for the $5 it costs, Crosman Nitro Lube can be a good investment to protect your gun in the long run or fix it if it’s prone to jamming; just don’t use too much!

NcSTAR Red-Dot Sight (With 4 Different Reticles) Review

The NcSTAR Red-Dot sight is a great multipurpose battery powered optic. With 4 different reticles, you can use it for a wide range of situations from pin-point long distant shots to Close Quarter Battle. It comes with an extra battery, a lens cover, a Allen Wrench, a small screw driver to open the battery compartment with, a cloth to clean the lens with, and a manual. It’s also available in black, camouflage, and silver.

The NcSTAR Red-Dot sight is really a lot smaller than it looks. It’s roughly three inches long, one and a half inches wide, and two inches tall. Its small size isn’t necessarily bad, though. Its low profile is great for CQB and also makes it lighter if you have an already heavy gun.

One of the biggest attractions is the 4 different reticles: a small crosshair, a regular dot, a circle within a circle, and another small crosshair with a circle around the center. You can easily change between them by turning a knob on the very back of the sight. Having 4 different reticles is great, like I said before, because of its versatility. If you need to make a pin-point sniper shot you can switch to the normal red-dot, but if you need to go into a building or a tight space, you can switch to the circle within a circle reticle.

There’s also 7 different brightness settings. 1 being for darker surroundings and 7 being for bright surroundings. You change the brightness by turning the big knob in the middle of the sight.

The reticle is projected onto the glass by a little window near the back of the sight. If you look at the sight backwards you can actually see a miniature version of the reticle with a light shining on it inside the little window. This means if you’re using the NcSTAR Red-Dot sight at nighttime, someone could spot you from the light inside the sight. This, however, is something you just have to live with because all red-dot sight are more or less going to have the same problem.

The NcSTAR Red-Dot sight easily mounts to any standard weaver/picatinny rail by unscrewing the bolts on the side with the included Allen Wrench and then tightening them back up once you have the sight positioned on your rail.

Adjusting the sight is also very easy. There’s a bolt on the top of the sight, and one on the side. You simply turn the bolt on the top right or left to make it the reticle aim higher or lower, and turn the bolt on the side left or right to make the reticle air more left or right. But, straight out of the box, it was already deadly accurate on my personal Jing Jong M4 airsoft rifle.

The last thing worth noting is the battery. It’s a CR2023 3-volt Micro Lithium Battery and can be accessed by unscrewing the very top of the brightness-selector knob. Like I said before; it comes with a spare, but they last quite a while so you might not even need it.

To wrap things up, the NcSTAR Red-Dot sight is one of the best out there. It’s small and low profile, but still gets the job done. And it’s very customizable and can easily adapt to what you want to use it for. You really can ask much more from a red-dot sight.

JG M4 S-System Airsoft Gun Review (2010 Version)

The JG M4 airsoft rifle is one of the most popular airsoft AEGs on the market. It’s battery powered and has full and semi-automatic firing modes. It’s also almost completely metal making it feel sturdy and durable.

One of the first things you notice about the JG M4 is the Weaver rails. As you can see in the picture above, there’s a rail that runs along the whole top of the gun as well as one on the bottom. It also comes with two smaller rails that are meant for the sling mount, but you can place on either side of the hand guard and use for mounting accessories. The iron sights are also folding, so that you can have a unobstructed view of a scope or sight. It comes, like I mentioned, with sling mounts, too, that you can install and uninstall with a couple screws. And being built around the M4 design makes it compatible with most M16/M4 airsoft magazines and accessories.

You can also upgrade it internally. It comes with instructions on how to disassemble it so that you can easily upgrade springs, gears, etc.

The JG M4 shoots .20 gram BB’s at a blistering 420 Feet Per Second (542 FPS with .12 grams). That’s about as high as you can get from a AEG without modifying it. From 50 feet away you can shoot right through a Crosman Gel-Target. This makes target shooting a lot of fun, but it might hurt a little too much for a friendly backyard skirmish. Plus, most airsoft fields won’t allow guns over 400 FPS.

The accuracy is also very good. Right out of the box you can easily hit a person-sized target from over 90 feet away. You can also adjust the front sight, back sight, and the hop-up to make it even more accurate.

There are a lot of moving parts on the JG M4 which adds to the realism. When you pull back the charging handle a dirt-flap springs open and reveals a wheel to adjust the hop-up. And there’s also a “front aim assist” button on the right side of the gun that you can press in. On a real gun this would help unjam bullets,  but, on this airsoft version, it doesn’t do anything and is just for decoration.

The battery is really the only big problem with the gun. It’s 8.4v 1100mAh and takes about 4 hours to charge. But the main problem is getting the battery into the gun. The battery compartment is inside the hand guard where the Weaver rails are. To get to it, you turn two screws and the the lower half of the hand guard will fall open. But there’s only a little bit of space for the battery to fit into, and when you start to close the hand guard back up, the wires connecting the battery to the gun get caught in between the lower and upper half of the hand guard, making it impossible to close. It almost takes two people to keep the wires out of the way while trying to keep the battery from falling out.

But even when you do get the battery in, it drains very quickly. Within three or four magazines, you need to recharge again.

The magazines themselves are basically just like any other AEG magazine. You pour the BB’s into the top of the magazine and then wind a wheel on the very bottom to get the BB’s to feed into the gun. Although, they only hold 300 rounds, which isn’t a lot when you’re shooting on the fully-automatic setting. But, like I said before, the JG M4 is compatible with most M16/M4 magazines, so you can buy spares.

The last thing worth noting is the Rate of Fire. On the fully-automatic setting it honestly doesn’t shoot that fast (maybe about 500-600 RPM on a good day). It doesn’t shoot slow by any standard, but my $99 Crosman Pulse R76 out shoots it considerably.

Overall, the JG M4 S-System airsoft rifle is pretty nice AEG, with one of the highest velocities that you can get. It’s fully customizable with tons of Weaver rails, as well as upgradable internally. The ROF is fairly low, but the accuracy, velocity, and durable metal build more than make up for it.

Specs:
Feet Per Second: 420 with .20 gram BB’s (542 with .12 gram)
Accuracy: Great
Power: Battery
Caliber: 6mm
Recommended BB Weight: .20 grams
Magazine Capacity: 300 BBs
Manufacture: Jing Gong

Walther Special Operations P99 Airsoft Gun Review

The Walther P99 is a very iconic gun used world-wide; from James Bond to the German police to the latest Modern Warfare game. The Walther P99 airsoft gun is obviously a replica of the real thing. It comes with a silencer, extra magazine, and a larger grip replacement.

The main thing people notice when they look at the Walther P99 airsoft gun is the silencer. It’s suppose to be a “mock” silencer that’s just for show, but there’s a noticeably quieter sound when you shoot with the silencer on oppose to off. The silencer is removable (it simply screws on and off) but when you take it off, there’s a one-inch long orange tip that doubles as the thing that the silencer screws onto. It looks absolutely terrible, but it doesn’t effect performance. Also, the silencer completely obstructs the iron sights, making aiming much harder.

The orange tip doubling as the thing that the silencer screws onto  is an all-out design flaw/shortcut that Umarex (the manufacturer of this gun) took because it’s much cheaper to produce this way. Not only does the tip look horrible when the silencer is taken off, but it’s also very weak because it’s only made of plastic. This causes the silencer to break right off the gun, taking the orange tip with it, if you are at all rough with it.

Even if you manage not to break your silencer, it makes the whole gun very inaccurate. Because the silencer isn’t properly anchored to the gun, if you even slightly bump it it will bend a little bit and send BBs flying in every-which direction.

With the silencer taken off, the Walther P99 airsoft pistol is pretty accurate with .20 gram BBs. Even in the wind, it can hit a 12 inch gel target from 30 feet away with good consistency. And the sights are exactly like the ones on the real P99 which adds to the realism.

The magazines that come with the Walther P99 are really good. They hold 15 rounds and have a 100 round reservoir. The reservoir makes reloading time much quicker, since you can reload right from the magazine itself. Although, they are made completely out of light plastic, which makes them less durable and feel cheap.

The larger grip that the Walther P99 comes with is great for people with large hands. To replace the normal sized grip with the bigger one all you have to do is remove a pin and the grip will come right off, then you can just push the other one right on and put the pin back in. The larger grip makes the whole grip much bigger, although it isn’t flush with the rest of the gun and looks kind of stupid with a considerable gap between the grip and the handle. It’s sturdy and does the job, though.

The safety is absolutely ridicules. It’s a tiny little half-circle that you have to pinch with your index finger and thumb and turn to select “fire” or “safe”. If you need to take the gun out and start shooting in a timely manner, which you usually have to do with sidearms, it takes over three extra seconds to hold the P99 in one hand and turn off the safety with the other. This wasted time can result in you being tagged in a airsoft skirmish.

The last thing that’s worth noting about the Walther P99 is a little red dot on the back of the gun that pops up when there’s a BB in the chamber and goes back down when there’s not. This kind of makes the gun look even more like a toy, but the red warning dot can be helpful if you just pick the gun up and don’t know if it’s loaded. Personally, I like this feature.

To wrap things up, the Walther P99 Special Operations airsoft pistol is a okay spring pistol. The silencer looks cool, but really doesn’t serve much purpose and is very easy to break. And the magazines are really the highlight of the whole gun. I would think of this gun more as “just for show” kind or gun (like a airsoft revolver); it truly doesn’t have much useability, but it’s unique and different. For the $20 that it costs, though, as long as you’re very gentle with the silencer, it’s worth the buy.

Specs:
Feet Per Second: 300
Accuracy: Bad with the suppressor, Moderately accurate without it
Power: Spring (you must pull back the slide before every shot)
Caliber: 6mm
Recommended BB Weight: .20 grams
Magazine Capacity: 15 BBs
Manufacture: Umarex

20 Tips and Pointers to Greatly Improve Your Airsoft Skills

These are 20 tips and pointers to greatly improve your airsoft game. As long as you keep these tips in mind, you will see much improved accuracy, focus, and overall performance in your airsoft. But, read these tips with a grain of salt, for example, numbers 12 and 13; having a bunch of different guns gives you versatility to use different style guns in different situations. But the point 12 and 13 are making is that if you are thinking about spending a bunch of money on a bunch of different guns, maybe you should think about buying one really good gun or upgrades for a gun you already have, instead.

  1. Always use your sights. You should almost never fire from the hip, even with fully-automatic guns.
  2. Practice how you would be in a game. Wear all the equipment, clothing, and use the exact guns that you would be using in a actual airsoft match while you practice.
  3. Use the correct BB weight for each individual gun. When you first get a gun, you should test which BB weight works best for that gun (test with the three major BB weights: .12 gram, .20 gram, and .25 gram). Look for accuracy and how far the BB will go before it lands.
  4. Keep a good grip on your gun while you’re shooting. Keep the stock (if you have a stock) firmly pressed against your shoulder and your weak hand holding the gun, while your strong hand pulls the trigger.
  5. With spring pistols, keep the gun in your strong hand and cock the slide with your weak hand. (Some people do it the opposite way because it’s easier to cock with your strong hand, but it decreases accuracy)
  6. Take your time and aim. Don’t panic and start firing if you see a opponent in a airsoft match, take you time to line up your sights and make a accurate shot.
  7. Once you fire, don’t wait around to see if you hit your target. After the BB leaves the barrel, there’s nothing more you can do. Immediately re-arm (get another BB chambered) your weapon before bothering to see if you’ve hit. If you missed, fire again. If you hit, move on.
  8. Wear the appropriate clothing. If you’re hot/cold/uncomfortable you’ll start hurrying shots and sacrificing accuracy.
  9. Calm yourself before a airsoft match. If you go in angry, nervous, etc. you will make mistakes. Get in the mind set of a robot: you need to remember all of what you’ve learned while practicing and what you’ve read in this post and complete your mission.
  10. Practice makes perfect. I know I’ve mentioned practicing before, but it’s vital that you do so. The more BBs you put down range the better you’ll get.
  11. Push yourself. If you push yourself to hit a 12-inch target at 50 feet away, think about how easy it’ll be to hit a player from 20 feet. Try to find your maximum range and then practice from even farther away.
  12. Upgrade the airsoft guns you have instead of buying more of them. Investing in optics, extra magazines, and accessories will greatly improve your performance with that gun. Besides, you can only shoot one gun at a time anyway.
  13. Invest in a good quality gun. This adds to number 12, if you invest in a more expensive, better gun, it’ll pay off. AEG’s (Automatic Electronic Gun), for example, are good to invest in. They’re usually fully-automatic and one will serve you better than the two cheaper spring guns that you could have bought for the same amount of money.
  14. When retreating, don’t attempt to fire back. You should only retreat when it’s your last option and you’ve already tried everything to hold back opposing players. That said, you shouldn’t turn around to fire back if you’re already retreating. If you couldn’t hold off opposing players staying still, you’re not going to do anything randomly firing backwards as you are trying to run away. The chances of actually hitting someone is slim and trying will only slow you down and give the other team time to catch up to you.
  15. Be tactical. For example, if you’re planning to come around a corner (this especially applies for CQB game-play), take out your secondary, which is smaller and lighter than your primary, and breech the corner with that. This will allow you to bring your gun up and aim much faster than you would using your primary. As soon as you’ve cleared the corner, though, start using your primary again.
  16. Use all the tools at your disposal. If you have a airsoft grenade, don’t be afraid to use it. The same goes for if you have a flashlight, secondary, speed re-loader, or any other tool you may have. Make it as easy for yourself as you can.
  17. If cover is available use it. Unlike video games, though, visual cover might not be the greatest choice. The mandatory orange tip on the mussel of every airsoft gun pretty much makes it imposable to try to hide. If you’re laying down in visual cover and are spotted you are in some deep trouble. On the other hand, using physical cover is a good strategy. You can pop in and out of physical cover, making quick shots when you come out and then immediately going back in, gives the opposing players very little chance to hit you.
  18. When there’s a break in the action, you should immediately reload. When you do reload, make sure you’re completely maxed out. Depending on how safe you are, take time to get a BB in the chamber as well as completely reloading your magazine. Make sure to keep an eye out for enemy players and at least a couple bullets loaded into one of your weapons, while you reload the other one; you’re most vulnerable when you’re reloading.
  19. We’ve already mentioned practice multiple times before, but it’s important to maximizing your practice time. Apart from “pushing yourself”, drills are the best way to go. Practice everything: reloading, shooting while moving, shooting while lying down, coming in and out of cover, etc.. Do a drill multiple times. It will get boring and frustrating after a while but you just need to take a little break, reestablish yourself, and keep on going. Succession is key.
  20. The last tip is one of the most important and the most obvious. Take care of your guns and they will take care of you. Keep them in a safe place where they won’t be broken, lube and clean them as necessary, and (as mentioned before) give them the right ammunition.

TSD 1911 Non-Blowback CO2 Airsoft Gun Review

The Colt 1911 is arguably the most world-widely used handgun of all time. Everyone from the US Army to the SAS use versions of the 1911. TSD took all of the 1911’s power, accuracy, and durability and incorporated them into their 1911 airsoft pistol.

The TSD 1911 has many of the features of a real Colt 1911, including a beaver-tail grip, block iron sights, and the caliber engraved on where the shells eject on a real 1911. It’s also made of mostly of metal, with the exceptions of the grips and the orange tip. Although it does have a hammer, it isn’t a working one; it is locked into place and is solely for decoration.

Since the TSD 1911 is CO2 (a version of Green Gas) powered, you can fire it as fast as you can pull the trigger. There’s no need to cock the slide back every time you shoot, like you do with spring pistols. This makes giving covering fire in a airsoft battle very easy. But, you run out of ammo quickly, so it might be a good idea to invest in extra magazines.

The magazines them selves hold 15 rounds and are fairly easy to reload. They’re made of some type of metal and are very durable. They’re skinny though, because it has to squeeze in next to the CO2.  To reload you have to pull the magazine spring down to the bottom where it locks into place, then you just push the BBs into a hole near the bottom, just like every other airsoft pistol.

The TSD 1911 takes 12 gram CO2 cartridges that go into a chamber that is located right behind the magazine, at the very back of the grip. To take the CO2 cartridges in and out the grip slides backward so that you can access it from the side.

Shooting wise, the TSD 1911 is very accurate with .20 gram BBs. The front sight has a white dot on it so you can aim much more accurately. However, it has a extremely heavy trigger pull, so it’s a good thing if you have a steady hand. You also start losing strength and accuracy when the CO2 cartridge gets low, but that’s to be expected.

It’s non-blowback which means that the slide doesn’t slide back when you shoot. This is both good and bad, because on the one hand blow-back looks awesome and makes it much more realistic, but on the other, blow-back is a CO2 drainer and you’d run out of CO2 in half the time that you normally would. You only get to shoot six or seven full magazines before your CO2 starts running out, anyway, so it’s probably better that it doesn’t have blow-back.

The last thing that you should take note of is the velocity that it shoots. With a new CO2 cartridge the TSD 1911 fires .20 gram BBs at a mind-blowing 400 FPS. Because of this, it might be to hot for friendly backyard airsoft skirmishes. If you wear heavy jackets or airsoft protection gear, you’ll probably be okay, but you just don’t want to be wearing a simple t-shirt or to get hit in the bare skin.

To wrap things up, TSD 1911 is a great sidearm that packs a hard punch. It’s very accurate and holds its own against heavy enemy fire. It also makes a great target shooting pistol. Just get ready to burn through some CO2!

Specs:
Feet Per Second: 400 (with .20 gram BBs)
Accuracy: Spectacular
Power: CO2
Caliber: 6mm
Recommended BB Weight: .20 grams
Magazine Capacity: 15 BBs
Manufacture: TSD Sports

Video Review:

Galaxy G1 Airsoft Gun Review

The G1 by Galaxy is modeled after the Colt 25. It’s tiny build makes it ideal for being used as a pocket pistol or in CQB.

The first thing you’ll notice about the G1 is its size. It measures roughly 5-1/2 inches long and 3-3/4 inches high! This makes it perfect to slip into your pocket. Some people use it as a third gun (if you get captured in a airsoft battle and are forced to give up your primary and secondary, you can hide the G1 in your pocket and when your captors have their backs turned you can whip this out and try to make an escape). The G1’s size also makes it ideal for CQB (Close Quarter Battle) and maneuvering around corners and obstacles.

The G1 is probably best used as a “third gun” or a back up to your secondary because of its small, inaccurate design. It can shoot accurately at short ranges (15-20ft), but is inaccurate at anything more. Using .20 gram BBs will make it much more accurate, but it still is unpredictable at ranges over 30ft.

It shoots 240 FPS, which, for a pistol of this size, is pretty decent.

A down side is that it has no safety. This means, for safety reasons, you shouldn’t keep a round in the chamber until the moment you’re ready to shoot. The down side is, since you don’t already have a round in the chamber, you have to cock it back first. It takes about 3 seconds to cock the slide and get your sights on target, which is plenty of time for an enemy airsofter to see you and shoot you.

The magazine on the G1 only holds 8 rounds and finding spare mags are nearly impossible. But, again, the main purpose of the G1 is to fall back on and give you the chance to try to make a escape when your primary/secondary has been captured, ran out of ammo, or malfunctioned.

The sights are pretty bad, but like I said above, it should mainly only be used to buy time in a airsoft battle.

Though, the G1 is made almost entirely of metal (technically it’s called “Zinc Alloy”, but it feels a lot like metal) with the exceptions of the magazine and grips. This gives the gun a really good feel and makes it exceptionally durable.

The last thing that is worth noting is the workings. When you pull the slide back and let it slide back forward, sometimes a BB will get stuck in between the chamber and magazine and won’t allow the slide back forward again. You must then remove the magazine and cock it back a few more times to clear it. This is a big hassle to do when the whole point of the pistol is to buy time.

To wrap thing up, the Galaxy G1 is a okay little pistol, the main attraction being that it’s so small. I recommend that it only be used as a fall back in a airsoft war when your other two guns fail. As for target shooting, it’s a fun gun to shoot, but just know that you won’t be hitting the target a lot of the time. But, if you want a tiny little gun that has relatively good FPS and feels nice and solid, this might be the one for you.

Specs:
Feet Per Second: 240
Accuracy: Good enough to buy some time
Power: Spring (you must pull back the slide before each shot)
Caliber: 6mm
Recommended BB Weight: .20 grams
Magazine Capacity: 8 BBs
Manufacture: Galaxy

Stinger P9T Airsoft Gun Review

The Stinger P9T is a updated version of Crosman’s legendary Stinger P9. Updates include a updated safety, a larger profile, and a larger 15 round magazine.

One of the bigger updates was to the magazine. The Stinger P9T can hold 15 rounds, oppose to the Stinger P9’s 12. But a huge downside it that it no longer has a reservoir. This is a big deal if you plan to use it in airsoft fights. Also, the magazine’s bigger than the old one, so you can’t even use old P9 magazines.

The safety is located very close to the back of the gun so that it’s hard to reach. You have to pretty much hold the gun with your weak hand and then flip the safety forwards or backwards with your strong hand to effectively work it. I don’t know why Crosman decided to do that; probably so that kids with small hands can operate it better. It’s also reversed, meaning that forward is safety and back is fire. This is a design flaw because when you shove it into a holster, sometimes the holster catches it and it switches it to fire.

The old Stinger P9 was known for it’s smooth slide and easy trigger pull, but the Stinger P9T just isn’t the same. When you pull the slide back to cock it it feels like you’re grinding metal on metal. Also, the slide only pulls back about a inch, making it feel like you didn’t cock it all the way. The trigger pull is not for the weak, either. You have to really squeeze it to make it fire. This heavy trigger pull really slows you down when you’re trying to put some plastic down range.

One thing that didn’t change is the stunning accuracy. With .25 gram BBs you can hit a 12 inch gel target from well over 40 feet away. If the Stinger P9 and the Stinger P9T went head-to-head, I’d actually have to say that the Stinger P9T is a little bit more accurate.

Another good thing about the Stinger P9T is that it has a lot more metal than the old Stinger P9. The trigger is metal, along with several internal pieces that are visible with the clear plastic colored models.

With most of the Stinger P9T’s you get a holster included. But the holster is terrible. The old holsters that came with the Stinger P9’s had a Velcro strap on the back so that you could easily take it on and off. It also had a snap thing that you could take the strap that secures your gun into the holster off with, and you could also undo a clip and get the strap off that way. These new holsters just have a loop on the back to put your belt through, meaning you have to undo your whole belt to get it on and off. Also the only thing that keeps the gun securing strap in place is a narrow strip of Velcro.

The last thing that you’ll notice about the Stinger P9T is it’s weight. It is really heavy; unloaded it weighs close to 1-1/2 pounds! This is good and bad. On the one hand it feels very realistic and solid, but on the other it might start to wear on you after a hour or two of shooting.

Through all the down sides, the Stinger P9T can be a good side arm. In my mind, it doesn’t quite stack up to the Stinger P9, although the accuracy is actually a little better. If you make sure to use .25 gram BBs, buy a better holster, and possibly buy some extra magazines, it could make a pretty good spring pistol.

Specs:
Feet Per Second: 275
Accuracy: Great
Power: Spring (you must pull back the slide before each shot)
Caliber: 6mm
Recommended BB Weight: .25 grams
Magazine Capacity: 15 BBs
Manufacture: Crosman

Video Review:

Airsoft: Getting Started

Airsoft is a fun and thrilling sport, beating video games any day with real action and a real risk of getting shot.

If you’re completely new you can get familiar with some airsoft lingo here: www.airsofterunited.wordpress.com/crash-course

The first thing you want to make sure of is that you’re sure you want to get into airsoft. While it’s extremely fun and builds good morals by working on a team, it can also hurt when you get shot and you should be willing to invest good money into it. If you know you don’t want to be shot by a airsoft gun from time to time then you shouldn’t even consider getting into airsoft, just get a BB gun to shoot targets with. Also understand that in order to have good guns, gear, camouflage and other things you need for airsoft that you’ll have to spend a lot of money on it.

If you’re sure you want to get into airsoft then the first thing you need is a gun. For someone just starting airsoft you should look at getting a spring powered gun (again, if you don’t know what “spring powered” means then you should read the crash-course). Spring powered guns are cheap, easy to maintain and super durable. Crosman is an example of really good spring guns. I highly recommend something along the lines of the Crosman Stinger R34 or the Crosman Stinger P9.

Once you find a gun that you like you should buy things for it instead of buying more guns. For example, extra magazines, sights, etc..

Taking care of your guns is a big deal, too. Besides the usual cleaning and lubrication that you should be doing anyway, make sure to keep your guns somewhere safe (in a closet or something). Do not just throw them in the corner with your backpack and dirty cloths. A broken gun won’t do you much good. Also give your gun the right ammunition. The three big BB weights are .12, .20, and .25 gram. Try each weight in your gun to see which preforms the best. Don’t buy cheap .12 gram if your gun doesn’t shoot well with it just to save money!

Beyond your guns you should also work on a collection of camouflage clothing and safety equipment. A pair of safety glasses, a camo long-sleeved shirt, and a backpack should be all you need to start out. As you get more experienced and better at airsoft you may start thinking about airsoft vests, gillie suits, airsoft gloves and other things, but you really don’t need those until you have been playing airsoft for a while.

Usually beginners don’t have enough money to blow on BBs; not with all the guns and gear that their buying in order to get started. That’s why it’s a great idea to buy a Gel-Trap Target. They run you about $8 if you get them from the store in the outdoors/airsoft section. And the idea of the Gel-Trap Target is that when you shoot it, the BB sticks and then drips down into a collecting trey so that you can reuse them. This saves you a fortune on BBs.

Getting into a airsoft club is the best way to jump right into the action. Although, almost always you have to be either over 16 and have a parent drive you to matches or be 18 or older. And usually airsoft clubs are pretty limited unless you live in a area where airsofting is popular. But, chances are that usually beginning airsofters learn of airsoft from a friend, so you should consult them on any known clubs in the area or if they have lots of friends that also airsoft, then you can just have a unofficial fight with a bunch of their friends.

Having actual airsoft matches are the best way to gain experience, but practice also helps. Take your Gel-Trap target out in your backyard and start shooting. As you get more used to your gun, you can start shooting while running and laying down. Practice definitely makes perfect.

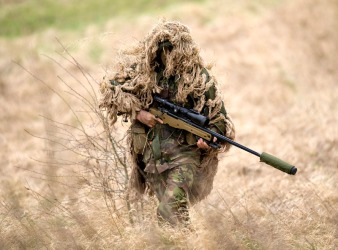
A last thing to think about as a beginning airsofter is what role you want to play in the future. For people just starting out I suggested the Stinger R34 (an assault rifle) and the Stinger P9 (a all-purpose pistol) above, but as you progress at airsoft you should start thinking about a specialty role that you could play. Roles include snipers, supportive fire, assault, and things like that. For example, I’m a assault guy so I carry around a M4 rifle and 1911 pistol. Some of the people I know specialize in sniping and they have a gillie suit, binoculars, and a sniper rifle. It’s up to you what you want to be. But, as a beginner, you don’t need to decide right now. Just start with the guns I suggested since they’re all-purpose weapons and go from there.

I hope this post helps you get started airsofting, and good luck!

(This is a posted copy of Airsofter United’s page, “Getting Started“)

How to Make a Airsoft Grenade

Airsoft grenades that you can find on the internet are usually expensive and almost always require gas/CO2 to operate. This means that unless you’re ready to deal with the expense that come with real airsoft grenades, you’re stuck making one yourself. Making it yourself isn’t all bad, though. It’s cheaper and you don’t have to wait for shipping, and you can modify it for bigger/smaller explosions.

This is what you’ll need:

  • Small water bottle (the thinner the plastic the better. Some cheap 20oz Aquafina bottles are great)
  • .12 gram airsoft BBs
  • A couple tissues
  • Vinegar
  • Baking Soda

Step 1 – The first thing you want to do is fill your bottle up about half way with vinegar (maybe a little more than half way). Then pour about 30 airsoft BBs into the bottle. You can use more or less BBs depending on how many people you want to hit.

Step 2 – Take a tissue and lay it out flat. In the middle pour about 1oz of baking soda (the more baking soda, the bigger the boom, just make sure that your roll isn’t to fat to fit through the mouth of the bottle) then roll the tissue up, making a long straw type shape. Make sure to fold up both ends at some point during when you’re getting to the end of rolling it up, making sure that no baking soda will fall out the top or bottom.

Step 3 – Now when you’re ready to throw your grenade, drop the baking soda roll through the mouth of the bottle, screw the cap of the bottle on as tight as you can and then shake. You should feel the bottle getting bigger and bigger in your hand. When you think it’s about to blow, whip it at something solid near your targets. Pavement is ideal, but a wood structure or anything else is good. If you simply toss it on the ground it may not build enough pressure to explode; the best thing to do is whip it at something solid, as stated above. The thinner the plastic is on your bottle is the better chance you’ll have of a good explosion.

When the grenade goes off the sound is very loud (close to the sound of a gun shot). So, you may not want to use these at night or in the early morning. The bottle also gets completely shredded, so it’s pretty much a one-time use.

BBs fly within a 20-30ft radius. Depending on where you get hit it’ll sting a little bit.

Please give all credit for this project to SirBuffaloSushi and AirsofterUnited.wordpress.com